

Home > Tutorials > How to create Icon with transparent background
How to create an Icon with transparent background
In this manual:
- What is icon?
- Selecting Windows Icon mode
- Preparing source image
- Adjusting alpha channel settings
- Selecting crop regions
- Saving icon
To get started with Icon Constructor quickly, we highly recommend you to review the description of the .ico file format to get better understanding of the program's operation techniques. The complete description can be read in the article What is Icon?
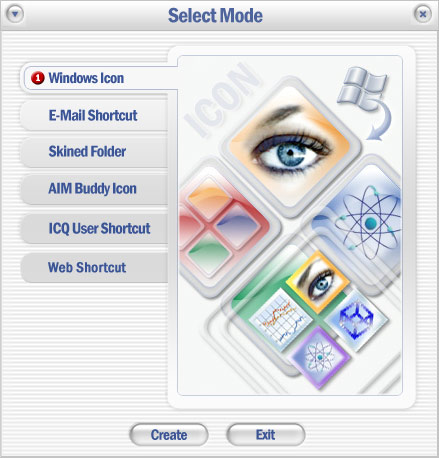
Icon Constructor offers a great number of ways to
create and use icons. Since we are going to create an .ico file, we
will need to select the Windows Icon (![]() ) mode in the Select Mode dialog on startup.
) mode in the Select Mode dialog on startup.
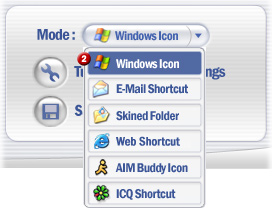
Besides using the startup dialog, you can also switch
mode in the program's main dialog. For that purpose, use the Mode drop-down list in the bottom-right corner of the main window. Clicking
on the drop-down list will open the menu with all available modes. To
create an .ico file, we will need to select the Windows Icon (![]() )
item on the menu:
)
item on the menu:
To create an icon with transparent background, without applying styles or borders, try using the following image formats - BMP(32-bit), PNG(24-bit with alpha-channel), TGA (32-bit), and Photoshop PSD.
Adjusting alpha channel settings
By default, Icon Constructor fills transparent areas with the color specified in the options dialog. We will need to preserve all transparent areas to convert our image to an icon with transparent background. For that purpose, we will need to enable alpha channel.
To enable alpha channel:
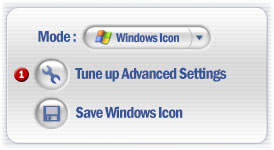
1) In the bottom-right corner of the program's main
window, click on the Tune up advanced settings (![]() ) button.
) button.
2) In the dialog that appears, clear the Discard Alpha-Channel (![]() )
checkbox in the Alpha-Channel Settings section and then
click OK (
)
checkbox in the Alpha-Channel Settings section and then
click OK (![]() )
to continue.
)
to continue.
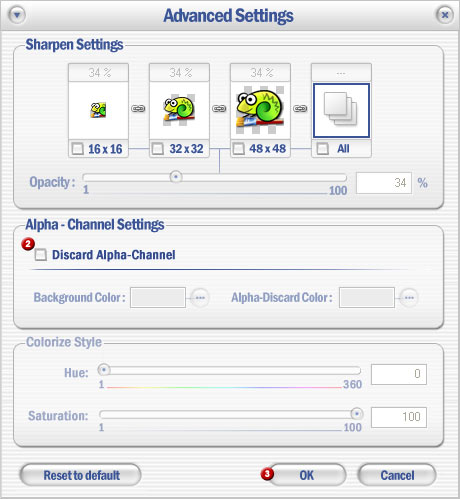
Note: Styles will be disabled when alpha channel is enabled. Styles will not be applied to the icon, and the styles toolbar will be disabled.
There are two ways for selecting crop regions: Fixed and Normal.
When should we use the Fixed-Size mode? The Fixed-Size mode is to be used when the source image has logo drafts for all sizes required for the icon, and you do not want to lose the image quality when cropping the image. Example: Using the Fixed-Size mode.
When should we use the Normal mode? The Normal mode is used when you have one image, from which you need to create an icon. Since an icon contains several formats of different sizes, Icon Constructor will automatically fill all those formats with the selected region. Example: Using the Normal mode.
Example. Creating an icon using the Fixed mode
For the source image, we are going to use a PNG file with alpha channel, which already has logos for icons of 16x16, 32x32, and 48x48 pixels. Here is an example of the source image:
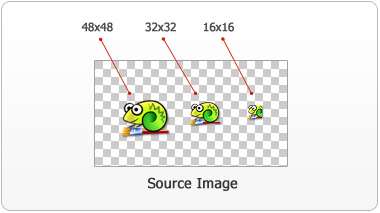
Since we want to convert this image to an icon that will look just
the way it appears on the above figure, we will need to use the Fixed size
to avoid losing the quality when transforming the crop region. Using the Crop style (![]() )
drop-down menu, select the Fixed Size mode.
To make our work more convenient, let's zoom in on the image using the Zoom
tools (
)
drop-down menu, select the Fixed Size mode.
To make our work more convenient, let's zoom in on the image using the Zoom
tools (![]() ).
).
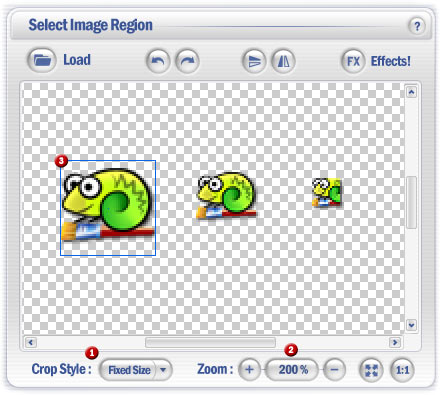
Now we are going to set crop region size for each individual size. In
the Icon Settings panel, select the size of 48x48 (![]() ).
).
![]()
Next, define the crop region for this size by dragging the rectangle (![]() )
on the logo of the corresponding size in the source image. Repeat the
same for the sizes of 16x16 (
)
on the logo of the corresponding size in the source image. Repeat the
same for the sizes of 16x16 (![]() )
and 32x32 (
)
and 32x32 (![]() )
pixels. When done, we are going to have an icon suitable for all
formats. All we have to do now is save it.
)
pixels. When done, we are going to have an icon suitable for all
formats. All we have to do now is save it.
Example. Creating an icon using the Normal mode
For the source image, we are going to use a PNG file with alpha channel, which already has a logo of 150x150 pixels. Since this size does not match the icon standards, we are going to use the Normal crop mode, which will let us define a custom-size area, which will be scaled to the default icon sizes.

On the Crop style (![]() )
drop-down menu, select the Normal mode.
)
drop-down menu, select the Normal mode.
![]()
In the Icon Settings panel, select All Sizes (![]() )
and then define the crop region by dragging and resizing the rectangle (
)
and then define the crop region by dragging and resizing the rectangle (![]() ).
When this setting is finally made, just save the icon to finish.
).
When this setting is finally made, just save the icon to finish.
1) In the bottom-right corner of the program's main
window, click on the Save Windows Icon (![]() ) button.
) button.
![]()
2) Next, in the export icon dialog that appears, set
the switch to the Save as Windows Icon (![]() )
mode.
)
mode.
![]()
3) To configure the list of formats to be included
in the icon, click on the Set Output Size & Formats (![]() )
button.
)
button.
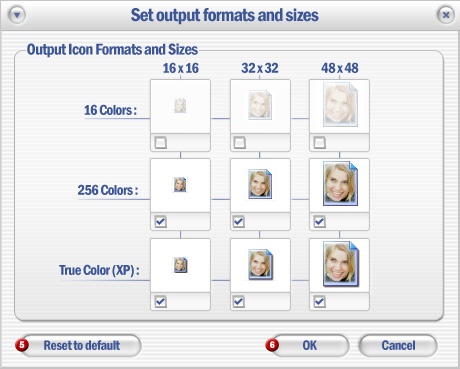
Select the required formats to be included in
the icon in the dialog that appears by clicking on the checkboxes by the
images. By default, the program will include all sizes with 256 and all sizes with colors RGB/A (True Color XP). If you
want to reset your selection to default, click on the Reset to Default (![]() ) button. When you are done with the settings, click OK (
) button. When you are done with the settings, click OK (![]() )
to continue.
)
to continue.
4) Now click Next (![]() )
in the Export Wizard dialog. In the Save As... window
that appears, select the folder where the icon will be saved and enter the
icon file name. Then click on the Save button to finish.
)
in the Export Wizard dialog. In the Save As... window
that appears, select the folder where the icon will be saved and enter the
icon file name. Then click on the Save button to finish.